Wednesday 24 July 2013

July Ipsy Glam Bag

Today's post is all about beauty! I received a year subscription to Ipsy this Christmas and have received 8 bags since then. If you are not familiar with Ipsy, it is a $10 a month, monthly subscription service which provides 4 to 5 beauty products/samples. Unlike other subscription boxes Ipsy (which used to be called My Glam Bag) comes in a small make up bag, so every month you do not only get a variety of beauty products but a cute make up bag as well. One thing I particularly love about this subscription service is the fact that you receive not just make-up, but hair and face/body products also.

Every month has a different theme and the products included in that month's bag follow suit with the theme. For example April's bag's theme was Pretty In Pink and included items such as pink nail polish,  pink lip gloss etc... July's theme was Beach Beauty and included the following items:


The colours included in the Ipsy Bags were: Rose Romance ( a frosty, nude pink) Fuchsia Flirt ( a soft, bubblegum pink) and  Coral Crush ( a bright, coral-y pink). The colour I received was Coral Crush and I love the colour! The consistency is smooth and creamy yet when sets is fairly dry. I would recommend applying a plain lip balm over top, such as an eos or baby lips. The colour is super long wearing and will stay on even after brushing your teeth or drinking water.


This palette included 3 eyeshadow colours, one from each of the new California collection palettes. The colours included (in order of picture) were: Hollywood, San Francisco and Malibu. Hollywood is a rich, deep purple. San Francisco is a bronze/beige glitter shadow. Malibu is also a glitter shadow in a yellow/gold colour.


Healthy Sexy Hair Soy Renewal Beach Spray


I have not yet tried this sample yet but am really looking forward to! I own the healthy sexy hair soy renewal spray but have not yet tried the beach version. I am hoping this will work in my curly hair so I will have nice, loose, beachy curls.


The product itself was fantastic. Yet the size of the sample wasn't overly amazing. A full size contains 50ml and judging by the size of the sample package the sample looked to contain about 2ml. Unfortunately the tube was only filled up a quarter of the way leaving only about 0.5 of a ml. Very disappointing. 


The final product I received this month was a fragrance from Demeter in Salt Air. In my opinion this smells more like fresh laundry or an interesting type of baby powder.  I will most likely not be wearing this fragrance as I prefer more fruity or sweet scents, however the size of the sample was great, not to mention the fact that it came in a convenient rollerball. 


Overall I wasn't blown away by this month's bag, and the only products that I would re-purchase would have to be the Pouty Pop Lip Crayon and Soy Renewal Beach Spray. If you are interested in subscribing to Ipsy click this link to get started. Subscribe to Ipsy


Ashlee <3


Tuesday 2 July 2013

List Of My Personal Favorite Blogs!

If you're anything like me, most of your time on the computer is spent checking out other people's blogs. (that and Pinterest, I'm a little bit obsessed).  Now I do realize that these aren't all blogs, however, some of these sites are just so good that I couldn't not put them on my list. Here is a short list of a few of them that I've been loving lately:


Health:

Peanut Butter Fingers
Fitnessista
Oh She Glows
Chocolate Covered Katie
Carrots n' Cake
Low Carb Cookie Jar- A close friend of mine, new to blogging, definitely go check her out!
Kath Eats Real Food


Baking:

Sally's Baking Addiction
Bakerella
Joy The Baker
Bake At 350
Bake Or Break

DIY:

P.S I Made This
I Spy DIY
DIY Crafts To Make
Find It, Make It, Love It
Martha Stewart
Dollar Store Crafts
Craft Gossip
Craft Bits

Beauty:

The Small Things Blog
EG Nails It
Drugstore Princess
Sparkle & Mine
Life Unsweetened


Well that's all for right now.  If you have any favorite blogs of your own please let me know! I love checking out new blogs! As I, myself am a new blogger please share my blog with any and everybody you can.


Ashlee <3


Sunday 30 June 2013

Happy Canada Day!

Hey all you Canadian blog readers! (I'm hoping there are lots of you) Happy Canada Day! (and for those of you reading this from the States, Happy July 4th!)


Today in our town there's a 1 mile run to start off the parade, followed by, you guessed it the parade! Later in the day the festivities include fireworks, swimming and hopefully some nice weather!


Hope you guys have an awesome Canada Day wherever you are! Let me know what you're up to!


Ashlee <3

Tuesday 25 June 2013

Recipe: Salted Caramel Chocolate Chip Cookies


Ok seriously, salted caramel chocolate chip cookies! Yes you read that right! How delicious do those sound? I remember the almost identical ones that Tim Hortons used to make and they were absolutely phenomenal!  Again this will be my first time making these guys. But I can't wait to dive right in. Personally the sound of some chopped pecans in this recipe sounds absolutely devine, so I will be adding 2/3 cup of those.


Recipe Adapted From: Culinary Chat                             


Makes 3 dozen:
  • 2 cups + 2 tablespoons all-purpose flour
  • 1/2 teaspoons baking soda
  • 3/4 cup (1.5 sticks) salted butter, softened
  • 1 cup light brown sugar
  • 1/2 cup sugar
  • 1 egg, at room temperature
  • 1 egg yolk, at room temperature
  • 2 teaspoons vanilla extract
  • 1 cup semi-sweet chocolate chips
  • 2/3 cup chopped pecans
  • 16 wrapped caramels, cut into 4 or 5 pieces each
  • Sea Salt for garnishing

Preheat oven to 325° F.
Mix the flour and baking soda in a bowl and set aside.
With an electric mixer or stand mixer with a paddle attachment, cream the butter and sugars together. Add the egg, egg yolk, and vanilla and mix well. Gradually add the flour mixture and stir until a dough forms (may take a couple minutes of stirring). Fold in the chocolate chips and pecans (do not add the caramels yet). Do not overmix the dough at any point in this process.
Chill dough for at least 30 minutes (or up to 5 days) in the refrigerator. Drop by tablespoonfuls onto ungreased baking sheet. Press a few pieces of caramel onto the tops of the cookies. Bake for 8-10 minutes or until edges are slightly browned. The centers should appear very soft and puffy. Sprinkle each cookie with sea salt while they are warm. Let cool completely and enjoy!
*Make sure to keep dough cold at all times while the batches are baking. I kept my dough in the refrigerator in between batches


Cookies anybody?
Ready to eat!


Now I'm not going to lie this recipe was absolutely amazing! They are definitely fully loaded with lots of chocolate chips, pecans and ooey gooey caramel pieces. My only complaint was that the dough was on the crumbly side, but this is understandable with the amount of stuff in the dough. There is no salt in the dough but don't be tempted to add any. The light sprinkling of sea salt on the top makes it just right. 

Hope you guys enjoy the recipe as much as I did!


Ashlee <3

Sunday 9 June 2013

Recipe: Ice Cream Sandwiches

For today's post I will be attempting a new recipe. I'm going to making homemade ice cream sandwiches! I'm using a chocolate cookie recipe and filling them with vanilla ice cream, rolled in decorative chocolate candies/sprinkles! I personally am not a huge cake fan so I decided that some ice cream sammies would hit the spot for a summer beach birthday party!

The Recipe: Courtesy of Annie Eats

Yield: Makes approximately 10 sandwiches (or 20 cookies if you wish to eat them by themselves)

For The Ice Cream:

1 cup whole milk
3/4 cup sugar
2 cups heavy cream
Pinch of salt
1 vanilla bean split in half length wise
6 large egg yolks
3/4 tsp. vanilla extract

For The Cookies:
4 tbsp unsalted butter
1/4 cup vegetable oil
1 cup light brown sugar
2 cups all-purpose flour
2 large eggs
1 tsp vanilla extract
1/2 cup unsweetened cocoa powder
1 tsp baking powder
1/4 tsp salt

Directions:

Combine the milk, sugar and 1 cup heavy cream in a medium saucepan. Heat over medium high heat, stirring occasionally, until warmed through. Scrape the seeds from the vanilla bean into mixture and add the husk of the bean as well. Cover the saucepan, remove from heat and set aside to steep for 30 minutes at room temperature.

Pour the remaining 1 cup of heavy cream into a large bowl with a fine mesh sieve over the top. In a separate bowl, whisk together the egg yolks. Slowly pour some of the warm milk mixture into the egg yolks, whisking constantly to temper the eggs.  Continue until you have all of the milk mixture added. Return the mixture to the saucepan.

Stir the mixture constantly over medium heat with a heat-proof spatula, being sure to scrape off the bottom off the pan as you stir. Continue stirring until the mixture begins to thicken and coats the back of a spoon. (about 170-175°F) Pour the custard through a mesh sieve and stir it into the cream. Place the vanilla bean into the custard mixture, stir in the vanilla extract and stir until cool over an ice bath. Cover and chill thoroughly in the refrigerator.

Remove the vanilla bean from the ice cream batter, stir well and freeze into your ice cream maker as according to the instructions. Line a 9x13" pan with plastic wrap. When ice cream has reached a soft serve consistency, spread some of the ice cream into the pan, spreading about an inch thick. Freeze until firm.

In the bowl of an electric mixer, combine butter, oil and brown sugar. Beat on medium speed until combined. Blend in the eggs one at a time and the vanilla extract until smooth. Then add in all of the dry ingredients (cocoa, flour, salt, baking powder). Mix on low speed until combined. You should then have a soft chocolate cookie dough. Gather the dough into a disk, cover with plastic wrap and chill for at least one hour in the refrigerator.

Pre heat oven to 350°. Line a baking sheet with parchment paper. On a lightly floured work surface (or a non-stick silicone baking mat) roll out your dough until it's about 1/4 inch thick. Use a circle or square cookie cutter to cut out your cookie shapes. (this step is not necessary but it ensures the same size cookies for your sandwiches) Bake for 8-10 minutes. Let cool on the baking sheet for a few minutes before moving onto a wire cooling rack.


As delicious as the ice cream part of the recipe sounds, I decided to use store bought vanilla ice cream since the recipe sounded like a lot of work.

I also decided to use shortening instead of oil since all we had was olive oil and sometimes using olive oil in baking can give it a funny flavour.

Here are the few first ingredients in the mixer:


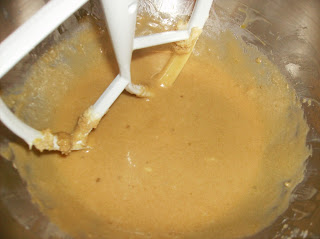
Combined:


 With eggs and vanilla added:


 Adding the dry ingredients:


Soft chocolate cookie dough:


Dough rolled out:


Cookies cut-out ready to be baked:

Final Product without ice cream:


Final Product with ice cream:


Please excuse my not so professional photography skills! I decided to be more festive and added some colourful little chocolate sprinkles to the outside. The chocolate cookies were very rich and chocolaty and not overly sweet (a good balance once the ice cream was added). The recipe was fairly simple and straight- forward withe easy to follow instructions.  Would definitely make again!


Ashlee <3


Wednesday 5 June 2013

Review: Beazu Beading Wire


For today's post I decided that I would do a review, since time did not permit to do a project :( Anyways today I've got a review to do on my all-time favorite beading wire! The wire is the 22 gauge (which is the most common gauge for wire work, for those who don't know) or 0.6mm, though gauge is the preferred term. It's silver plated wire with a copper core. 1 package of 10 metres of wire retails for $6.50 at my local bead supply store. However the price may vary throughout stores.  Unfortunately I was unable to find the price online as you have to actually own a store to view the prices.

On to the product itself. One of the main reasons that I love this wire is the fact that it's not too spring-loaded. Some of the beading wires that I've boughten have been super spring-loaded, therefore making it difficult to wrap. It is of course somewhat spring-loaded as is almost all types of wire out there. Another nice part about the wire is that unlike some it doesn't rust. One of the problems with silver  plated wire can be that a) the silver can rust when it becomes wet and/or b) the beautiful, shiny silver coating on your wire can, after a certain amount of time wear off and expose the not so shiny and beautiful copper underneath it.

I've been using this wire for all of my beading projects for about 2 years now and have been absolutely in love with it! The only other gauge I've tried so far is the 26 gauge which is just slightly thinner but delivers the same excellent quality every time. I would highly recommend this wire to any and all beaders, especially beginners. This is a fool proof, never fail brand for me and I will continue to use it as long as I'm beading/wire working!

Hope you enjoyed my first review!

Ashlee <3

Tuesday 4 June 2013

Welcome to my blog!

So some of you may be wondering... what is a DIY high? Well in my opinion just the magic and thrill of creating something, anything really. My name is Ashlee and I am an avid crafter, baker and jewelry maker. On my blog you will be able to follow my journey of success, failures and everything in between. I will be experimenting with new recipes and projects hopefully every day or as frequently as possible. You will see the occasional video tutorial on simple beading or wire projects. I am also currently in the process of creating my own etsy shop (more info coming soon!) You can follow me on Instagram: @ashleetaylor28 or on pinterest with the username ashleetaylor28 As this is only my first, please look forward to some more exciting posts with pictures to come! 

Well that's all for now!


Ashlee <3